
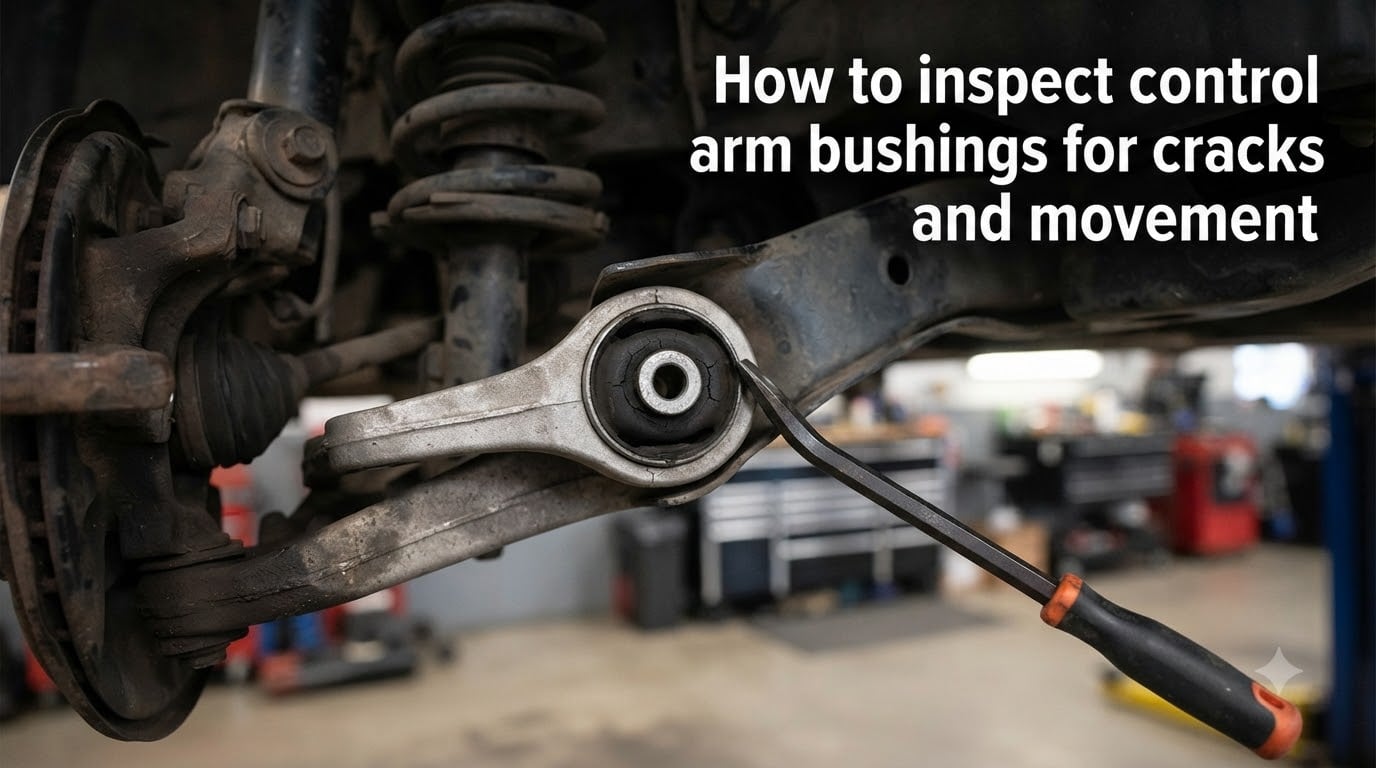
If your car has started clunking over bumps, wandering on the highway, or eating through front tires, the control arm bushings deserve a close look. I have spent years underneath my own vehicles and helped friends diagnose suspension issues in driveways and parking lots, and the bushings are one of the most commonly missed culprits. Knowing how to inspect control arm bushings for cracks and movement can save you from a surprise alignment failure, an expensive tire replacement, or worse, a suspension component separating at speed.
The good news is that you do not need a lift or specialized diagnostic equipment to check them. With a floor jack, a pair of jack stands, a flashlight, and a pry bar, you can perform a thorough inspection at home in under an hour. This guide walks through every step I use, from the initial visual check to the pry bar test that reveals hidden movement.
I will also cover how to tell the difference between harmless surface aging and cracks that actually need attention, because that confusion comes up constantly on forums like r/MechanicAdvice. Many drivers get quoted thousands at a dealership for bushings that are simply showing normal wear. By the end of this article, you will know exactly what to look for, what to ignore, and when it is time to hand the job to a pro.
Table of Contents
What Are Control Arm Bushings?
Control arm bushings are rubber or polyurethane mounts that connect your control arms to the vehicle’s chassis. They act as pivot points that let the suspension travel up and down while absorbing vibration and preventing that harshness from reaching the cabin. Each bushing typically has an outer metal sleeve pressed into the frame, a rubber inner layer, and an inner metal sleeve that bolts to the control arm.
Most vehicles have upper and lower control arms, and each arm usually has two bushings. That means a typical front suspension has four to eight bushings doing critical work every mile you drive. Over time, heat, road salt, oil contamination, and simple flexing cause the rubber to harden, crack, or separate from its metal sleeves.
When the rubber fails, the control arm can shift within its mounting point. That shift translates into steering looseness, alignment drift, and clunking noises. Understanding what these parts do makes it much easier to recognize the symptoms when they start to fail.
Why Cracked or Worn Bushings Are Dangerous?
Worn control arm bushings are not just a comfort issue. They directly affect how your car steers, brakes, and holds an alignment. I have seen vehicles come in with front tires worn down to the cords in under 10,000 miles simply because a lower bushing had separated and let the camber go wildly negative.
Cracked bushings allow the control arm to move under load, which changes your wheel alignment dynamically as you accelerate, brake, and corner. That movement can cause the steering wheel to shimmy, the car to pull under braking, and the handling to feel vague or twitchy at highway speeds.
In severe cases, a fully separated bushing can let the control arm shift far enough to contact other components or alter wheel position enough to affect stability. Driving on completely failed bushings also accelerates wear on ball joints, tie rod ends, and tires, turning a $40 part into a multi-component repair bill.
Tools Needed for Inspection
You only need a short list of basic garage tools to inspect your bushings properly:
Floor jack rated for your vehicle’s weight
Two jack stands (never work under a car supported only by a hydraulic jack)
Wheel chocks for the opposite end of the vehicle
Bright flashlight or shop light
Pry bar, ideally 18 to 24 inches long
Shop gloves and safety glasses
Creeper or thick cardboard for working underneath comfortably
A second person is helpful but not required. They can help by turning the steering wheel or rocking the car while you watch the bushings from underneath.
How to Inspect Control Arm Bushings for Cracks and Movement
This is the core of the process, and I break it into six clear steps. Follow them in order, because earlier steps can reveal issues that change how you approach the later ones.
Step 1: Safely Raise and Support the Vehicle
Start by parking on a flat, level, solid surface. Never jack a car on gravel, dirt, or a slope. Set the parking brake, place wheel chocks behind the rear wheels, and loosen the front lug nuts a quarter turn before jacking.
Lift the front of the vehicle using the recommended jacking point in your owner’s manual, then position jack stands under the frame rails or designated support points. Lower the jack slowly so the vehicle settles onto the stands. Give the car a firm shake before getting underneath to confirm it is stable.
Remove the front wheels. This gives you unobstructed access to the control arms, bushings, and ball joints. Set the wheels aside, lug nuts in a safe spot.
Step 2: Perform a Thorough Visual Inspection
Grab your flashlight and get underneath. Look at each bushing from multiple angles. You are checking for several specific things: visible cracks in the rubber, tears that go all the way through, rubber separating from the metal sleeve, missing chunks of rubber, and oil contamination that has softened the material.
Surface cracking on the outside of the rubber is common as bushings age, and small surface checks do not always mean failure. What you really want to find is a crack that penetrates through the rubber or a gap between the rubber and either metal sleeve. That kind of separation is what allows the arm to move.
Check both the front and rear bushing on each control arm. The rear bushing on the lower control arm tends to fail first on most vehicles because it handles the most fore-aft load under braking and acceleration.
Step 3: Perform the Pry Bar Test for Movement
The pry bar test is the single most reliable way to confirm that a bushing has failed internally even if it looks okay from the outside. Take your pry bar and place it between the control arm and a solid frame point near the bushing you are testing. Gently lever the arm up, down, forward, and backward.
A healthy bushing will resist the pry bar firmly. The rubber may compress slightly but the arm should not shift within the mounting point. If you see the arm move relative to the frame while the inner metal sleeve stays put, or if you hear a clunk or pop, that bushing has internal separation and needs replacement.
Repeat this test on every bushing, both upper and lower, on both sides of the vehicle. Compare left and right, because a difference between sides is often more telling than the absolute movement on one side.
Step 4: Inspect the Ball Joint Area
While you have the wheel off and the car in the air, check the ball joint that connects the control arm to the steering knuckle. Look at the rubber dust boot for tears, cracks, or grease slung around the area. A torn boot lets grease escape and contaminants in, which destroys the joint quickly.
To test for play, place the pry bar under the tire and lever upward while watching the ball joint. Any visible movement between the joint and the knuckle means it is worn. Some vehicles have wear indicators on the ball joint, so check your service manual for the specific measurement.
Ball joint wear often mimics bushing wear in how the car feels from the driver’s seat, so checking both while the vehicle is apart saves you a second round of diagnosis.
Step 5: Check for Pothole or Impact Damage
If you recently hit a large pothole, a curb, or a piece of road debris, look specifically at the control arm itself for bends, cracks, or fresh scraping. Compare the left and right arms side by side. A bent arm changes alignment instantly and will destroy tires in short order.
Check the mounting bolts for any sign of shifting or elongation in the bolt holes. Impact damage can cause the bolts to move within the frame bracket, which loosens the bushing clamping force and accelerates wear.
Also look at the surrounding components. A hard enough hit can damage the strut, sway bar link, or tie rod, and those parts are right next to the control arm.
Step 6: Do a Short Low-Speed Test Drive
After the visual and pry bar checks, put the wheels back on, lower the car, and take a slow drive in a safe area with the radio off. Listen for clunking over bumps, creaking when turning the wheel at low speed, or a knocking sound under braking.
Pay attention to how the steering feels. Vagueness on center, a tendency to wander, or the steering wheel not returning smoothly after a turn all point to control arm bushing play. Combine what you hear and feel on the test drive with what you saw during the inspection to build a complete picture.
Normal Wear vs Problematic Damage: How to Tell the Difference
This is where most DIYers and even some technicians get tripped up. Almost every rubber bushing on a car over five years old will show some surface cracking. That does not automatically mean it is failing. I use a simple comparison to sort harmless aging from real damage.
| Characteristic | Normal Aging | Needs Replacement |
|---|---|---|
| Crack depth | Surface only, does not penetrate the rubber | Goes through the rubber or reaches the sleeve |
| Rubber to sleeve bond | Rubber stays firmly attached to metal | Visible gap or rubber peeling away from sleeve |
| Pry bar test result | Firm resistance, no movement at mount | Arm shifts within the mount, clunking sound |
| Handling symptoms | No change in steering or ride quality | Clunking, wandering, vibration, uneven tire wear |
| Fluid contamination | Dry and clean | Oil or power steering fluid soaked, rubber is soft |
If your bushings fall into the normal aging column and you have no symptoms, leave them alone. Replacing perfectly functional bushings is a waste of money and introduces the risk of a poorly pressed part causing new problems.
Sound-Based Diagnosis: What Suspension Noises Mean
Noises are often the first sign of a bushing problem, and no top-ranking article covers this in depth even though it comes up constantly on Reddit and in DIY forums. Here is what different sounds typically mean based on my experience and what other mechanics report.
A clunk over bumps usually points to a lower control arm bushing with excessive play, though it can also be a worn ball joint or sway bar link. A creaking or groaning noise when turning the wheel at low speed, like pulling into a parking spot, often indicates a dry, hardened bushing that has lost its flexibility.
A knocking sound under hard braking suggests the rear lower control arm bushing is allowing the arm to shift forward under the braking load. A persistent vibration through the steering wheel at highway speed can come from a bushing that has hardened and stopped absorbing road input, even if it has not cracked yet.
The key is to combine what you hear with the visual and pry bar test results. Sound alone can point you in a direction, but confirmation comes from getting underneath and checking the part directly.
When to Stop Driving and Call a Professional?
Most cracked bushings are not an immediate roadside emergency, but some situations call for the car to stay parked until repairs are done. If the pry bar test reveals significant arm movement, if you can see the control arm shifting while driving, or if the bushing rubber is completely gone and the arm is resting metal on metal, stop driving.
The same applies if you hit a pothole hard enough to bend the control arm or if the steering suddenly feels unstable. A bent arm or a fully separated bushing can cause rapid alignment changes that make the car unpredictable at speed.
If you are not comfortable pressing bushings yourself, which requires a hydraulic press or a specialized tool, take the car to a trusted independent shop. Independent shops typically charge significantly less than dealerships for this work, and many Reddit users report dealership quotes of $1,200 to $1,800 for bushing replacement that an independent shop handles for a fraction of that.
FAQs
How do I check if my control arm bushings are bad?
Raise and support the vehicle safely, remove the front wheels, and visually inspect each bushing for deep cracks, tears, or rubber separating from the metal sleeve. Then perform a pry bar test by levering the control arm near each bushing to check for movement. If the arm shifts within the mount or you hear a clunk, the bushing is bad.
What happens if control arm bushings are cracked?
Cracked bushings allow the control arm to move under load, which causes steering looseness, wandering on the highway, clunking noises over bumps, and rapid uneven tire wear. In severe cases the alignment can shift enough to affect braking stability and handling safety.
How does a technician check for control arm bushing wear?
A technician raises the vehicle on a lift, visually inspects each bushing for cracking and separation, and uses a pry bar to lever the control arm and check for play. They may also use a dial indicator to measure exact movement and compare readings side to side to spot asymmetric wear.
What is the process for inspecting control arm bushes?
The process is: safely raise and support the vehicle, remove the wheels, visually inspect all bushings for cracks and separation, perform a pry bar test on each bushing, inspect the ball joint area, check for impact damage, and take a low-speed test drive to confirm any symptoms.
Can you drive with cracked control arm bushings?
Small surface cracks with no movement or symptoms are generally safe to drive on temporarily. Deep cracks, separation from the sleeve, or any arm movement detected in a pry bar test should be repaired before the vehicle is driven regularly, as the condition will worsen and can become dangerous.
Is surface cracking on control arm bushings normal?
Yes. Most rubber bushings develop shallow surface cracks as they age from heat and flex cycles. As long as the cracks do not penetrate through the rubber, the rubber stays bonded to the metal sleeves, and the pry bar test shows no movement, surface cracking alone does not require replacement.
Conclusion
Learning how to inspect control arm bushings for cracks and movement gives you confidence to diagnose one of the most common sources of suspension noise and handling issues. The combination of a careful visual inspection, the pry bar test, and a short test drive will tell you more than any single check on its own.
Remember the key distinction: surface cracks on aging rubber are normal, but through-cracks, separation from the sleeve, and any detectable arm movement during the pry bar test all point to a bushing that needs replacing. Catching these issues early keeps your tires alive, your alignment in spec, and your car safe on the road.
If your inspection turns up a failed bushing, get quotes from a couple of independent shops before committing to a repair. And if you found this guide helpful, bookmark it for your next suspension check, because bushing inspection is something worth repeating every time you have the wheels off for a brake job or tire rotation.